 The 2nd part of
your October 1st due assignment is to create a customized toolbar to
allow quick access to many of the commands in the Tools0 menu, Options command
View tab dialog box. You will create a
toolbar with six different icons. A
quick way to access the Tools menu Options command is the Alt, T, O key
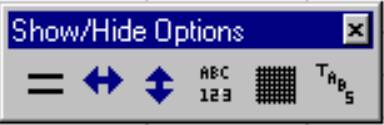
sequence. Here is what the customized
toolbar looks like:
The 2nd part of
your October 1st due assignment is to create a customized toolbar to
allow quick access to many of the commands in the Tools0 menu, Options command
View tab dialog box. You will create a
toolbar with six different icons. A
quick way to access the Tools menu Options command is the Alt, T, O key
sequence. Here is what the customized
toolbar looks like:
![]()
![]()
![]()
![]() Here is a list of what each
toolbar button does:
Here is a list of what each
toolbar button does:
1.
Show
or hide the Formulas for the Excel
worksheet.
2.
Show
or hide the Horizontal scroll bar.
3.
![]() Show or hide the Vertical scroll bar.
Show or hide the Vertical scroll bar.
4.
![]() Show or hide the Row & column headers for the Excel
worksheet.
Show or hide the Row & column headers for the Excel
worksheet.
5.
![]() Show or hide the Gridlines for the worksheet.
Show or hide the Gridlines for the worksheet.
6.
![]() Show or hide the Sheet tabs for the workbook.
Show or hide the Sheet tabs for the workbook.
Be
sure to study carefully and do the toolbars Lesson from your Reed Jacobson
textbook in preparation for doing this assignment.
How
to create the buttons on the Show/Hide Options toolbar?
 When you have the Customize
dialog box open and have any toolbar button selected, you can choose the
command Edit Button Image… to bring
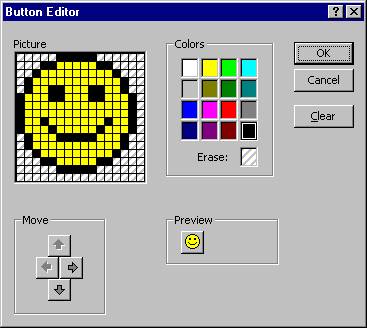
up the Button Editor dialog box. Here
is what that dialog box looks like:
When you have the Customize
dialog box open and have any toolbar button selected, you can choose the
command Edit Button Image… to bring
up the Button Editor dialog box. Here
is what that dialog box looks like:
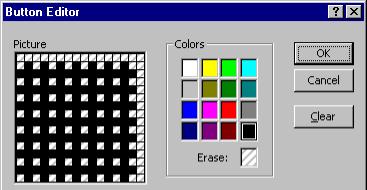
You
can select a color from the color palette.
It is clear that black is currently selected. Or you can choose the Erase: color to remove colors.
If
you have a color selected and click on a colored pixel, one of two things will
happen:
1.
If
the colored pixel is the same color as the selected painting color, the color
will be erased.
2.
Due date:
Monday, September 30th, 2002 Quiz #1: Friday,
October 4th, 2002![]()
If
the colored pixel is a different color than the selected palette color, the new
color will replace the previous color.
What
is the easiest way to create the 2nd and 3rd
buttons? Use the Change Button Image
command to change from the smiley face default icon to the Left or the
directional arrow for button 2. Then
use the Edit Button Image to draw in dark blue and add the Right arrow shape to
the icon. Then do the same process to
create the 3rd button.
What
is the easiest way to create the 4th and 5th
buttons? Use the Copy Button Image
command when the spell/grammar check button on the Standard toolbar is selected
(or when the align left button on the Formatting toolbar is selected). Then select the new, custom button and
choose Paste Button Image. Then you can
Edit Button Image to modify the image to look like my Show/Hide Options
toolbar.
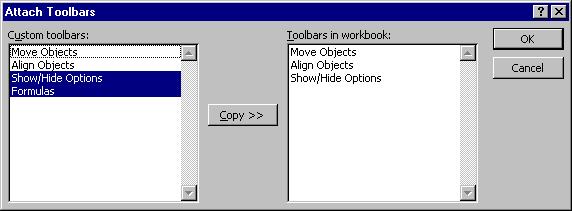
Here
is what the Customize dialog box Toolbars tab Attach… command button brings up
as a dialog box. Be sure to Attach your
new toolbar to a workbook and save it with that workbook. I suggest the name Toolbars.xls for the workbook.
Save it to your Z: drive, if you are working in the lab. Just name it Toolbars, and let Microsoft
Excel add the file extension (suffix), which will be .xls for Excel. I will have
![]()
you turn in a diskette
with the working Excel spreadsheet on it.
Here
is what the Button Editor dialog looked like after I finished creating the
customized image for the showing and hiding of the Excel worksheet
Gridlines. Of course, each button must
have a Tooltip to suggest what it is for, but the image itself should
always be planned so it intuitively suggests the task that the button is
designed to perform.
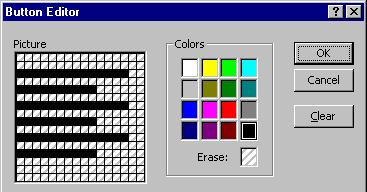
Here
is what the Button Editor looked like just before starting to create the above
picture. It has an exact copy of the
Align Left button image as the starting point.
Copy Button Image command with the Align Left icon selected was the 1st
step. The 2nd step was Paste
Button Image. The 2nd step
was done after selecting the custom button, the happy face button.
Lesson
One of the textbook shows how to “Toggle the value of a property with a
macro”. Study these pages. You will need to use the Not keyword so that your Visual Basic
statement changes the value of a property from True to False or from False to
True.