Initial Maker Program Assignment #1. Due: Monday, September 10thth
·
Alt+PrintScreen of the running program with your name as the
input data and results.
·
Printout
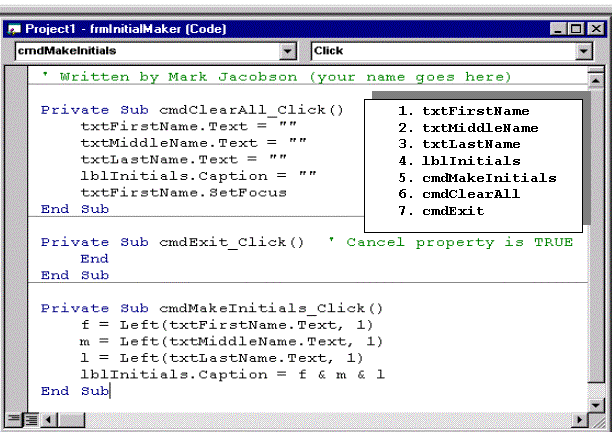
of the VB code with your name in a comment at the top of the code module.
1.
To
get a printout of what the running application looks like, you need to use the
Print Screen key.
2.
PrintScreen
by itself captures the entire screen to the clipboard. Holding down the Alt key and then pressing
PrintScreen for about ¼ second or so, captures only the active window or dialog
box to the screen.
3.
To
turn in screen snapshots of what your running Visual Basic program looks like,
simply run the program and then enter data and do commands until the
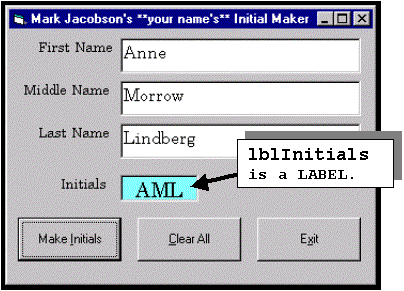
application is just as you want it look for the hard copy printout. Using your own name as data would be a
wonderful idea.
4.
Press
and hold down the Alt key, and then press the PrintScreen key for ¼ to ½
second. This places a copy of your
running application window (FORM) on the windows clipboard.
5.
Start
up Microsoft Word or PhotoShop or WordPerfect or WordPad or some application
you have available. Notepad will not
work. Use the Edit menu Paste command
or the Ctrl+V shortcut to Paste the graphic snapshot into your document or unto
your canvas.
6.
Print
the Word (or whatever) document. Note
that the document has your name in it.
That is why I always have the title bar of the Form contain the
student’s name. Remember that! Your name is always part of the Caption
property of the FORM object!
7.
You
will also turn in a printout of your Visual Basic code. You do not need to turn in the Form Image or
the Form As Text printouts.
If
you are brand new to using the Wright 112 and Wright 339 labs, I will be glad
to help you. The Z: drive is where you
can save all of your work. Change what
printer you are pointed to, if needed.