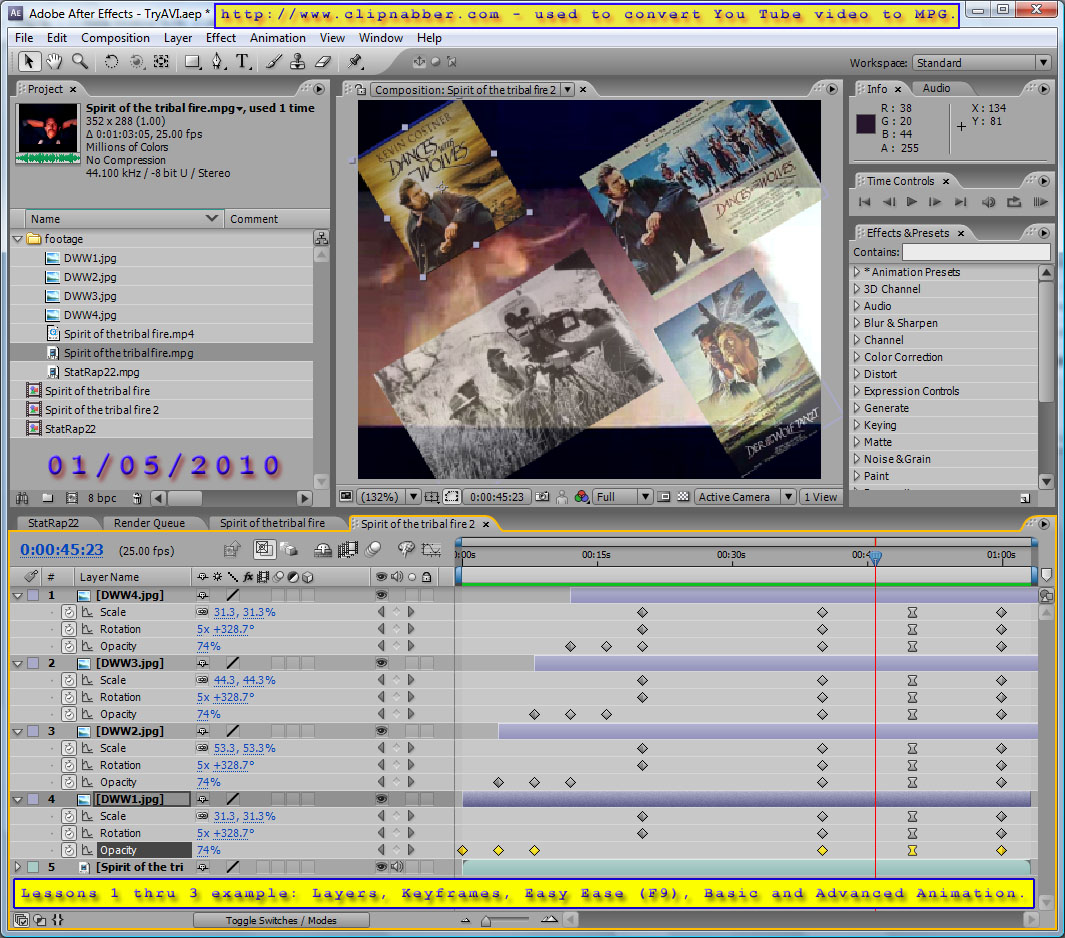
There are a total of 56 keyframes shown in the above Timeline panel. Each of the JPG layers has 14 keyframes. KF will be the abbreviation used to refer to KeyFrames throughout the class. Note that 12 of the keyframes have different shapes than the other 44 keyframes.
Page 32 of the textbook talks about Rendering. We will render to FLV (FLash Video) in this class. Page 32 at the end of Lesson 1 only shows you how to render to AVI format.
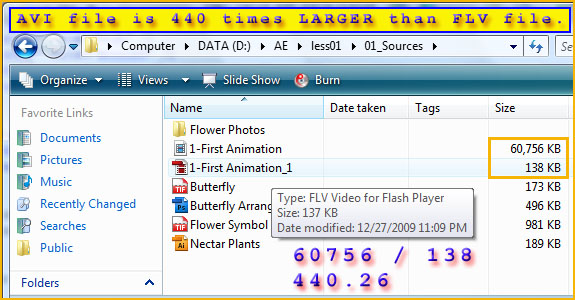
Notice that the AVI file that rendered created a file that Quicktime can play, but would be 59.3 MB or 60,756 KB. The FLV (FLash Video) format was used to render the same AE Comp resulting in a file about 0.1 of a MB and only 138 KB. As you can see above, the space requirements of the FLV Flash video is 440 times more efficient than the AVI.
Hmmmm. Which would you rather have users wait to view over the internet?
Note the Time Display above in the Timeline panel. The frame you see of the COMP (Composition or Composite) is 45 seconds and 23 frames into the Comp. Since the Frame Rate is 25.00 fps (Frames per Second), the animation has played almost 46 seconds here (at 45:23).
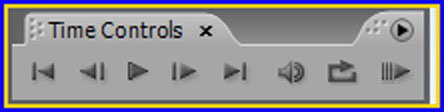
The Time Controls panel is part of the Standard Workspace. Notice above where the Time Controls panel is - it is just above the Effects and Presets panel.
First Frame
Use the HOME key is a better way to get to 0:00:00:00
Previous Frame
Careful. When I use this it often jumps 2 or 3 frames. It has to be a fast click. There are other ways to get to an exact frame, including clicking on the Time Display. We'll also use the previous KF and next KF shortcuts when working with animated properties to PARK on a KeyFrame.
Play/Pause
I usually use the 0 (zero) key on the Numeric keypad to PLAY and press the spacebar key or any key to PAUSE.
Next Frame
Jump ahead one frame. Or if your click it SLOW, jump ahead a couple of frames.
Last Frame
Using the END key is preferable.
How do you see just the Scale and Rotation and Opacity properties instead of having to Twirl down all of the TRANSFORM group of properties? (Anchor Point, Position, Scale, Rotation and Opacity = A P S R O).
Select the top or the bottom layer (DWW1.jpg or DWW4.jpg in this example).
Hold down the SHIFT key and select the bottom or the top layer to now have all four DWW JPEG layers selected.
Press the S key to twirl down just the SCALE property for all of the selected layers.
Hold down the Shift key and press the R key to twirl down and expose all of the ROTATION properties. Now you will be seeing the additional ROTATION property along with the SCALE property that was already revealed for the selected layers.
Hold down the Shift key again and press the T key. Think opaciTy or opaciTEE here. The shortcut for opaciTy is not O! Oh, that is something to knOw!
A = Anchor Point; P = Position; S = Scale; R = Rotation; T = opaciTy - APS RO maps to APS RT
Lessons 1 and 2 - Basic Animation and Advanced Animation:
F9 function key is the shortcut to making a selected KF (KeyFrame) ease in and ease out, which AE like to call Easy Ease.
Read carefully the information about Easy Ease Keyframe assistant on pages 27 and 45-46.
Changing the type of Keyframes - page 56.
Keyframe Basics - page 36.
Keyframe interpolation. KF velocity and KF influence.
Pages 42-43 - The Graph Editor view of Keyframes and the interpolation between KFs. 15 different GE (Graph Editor icons. Yikes! We'll SLOWLY get used to all of this, or rather SLOWLY get used to a subset of the features of Adobe After Effects animation and interpolation.