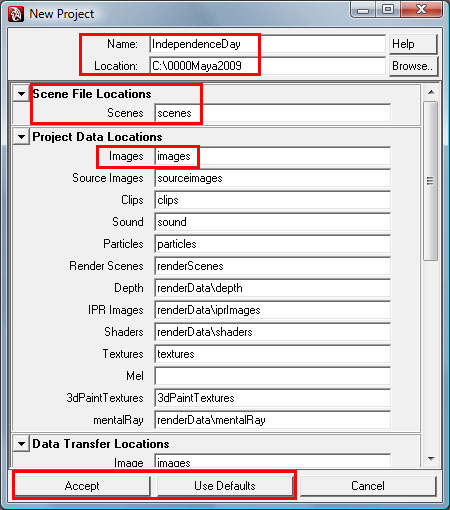
- New Project dialog box - change the Name: from the default New_Project to IndependenceDay.
- Set the Location: to wherever you want this project folder IndependenceDay to be stored at. I am saving my project in the C: drive 0000Maya2009 folder for purposes of this tutorial. C:\0000Maya2009 is the Location: value.
- Click the Use Defaults button at the bottom of the New Project dialog box.
- Click the Accept button.


- Note that the project folder is IndependenceDay and that the images folder is where the rendered frames of the animation will be stored by Maya whenever you do a Batch Render after you set these Render Settings.
- Be sure to choose the name.#.ext format for the Frame/Animation ext: choice in the dialog box above!
- The End frame: value will NOT be set to whatever your Maya timeline or playback range is set to. You must remember to change this or it will just render frames 1 to 10 of your Maya scene. In other words, 10 is the default End Frame value.
- Choose TARGA, as shown above.
- Make up whatever name you want for the File name prefix. Otherwise, it will use a default name for the prefix. I usually choose a short, 4 or 5 or 6 letter long name such as ocean or ball or frodo or bilbo or staypuft, for examples.
- Click the Close button when you are finished.
- Render menu set > Render menu > Batch Render to render the entire animation and produce the frames. In this case, 200 frames are produced.
- Warning: Maya takes several minutes after you do this command before it even starts to do the rendering. You will NOT see the days of our lives icon indicating that processing is going on with the application. After several minutes you will begin to see messages flashing in the command response and error message area at the bottom right side of your Maya window. This will continue for anywhere from 1 or 2 minutes to 10 or 15 minutes depending on how long and how complicated your animation is. The animation that I produced here in this example took about 5 or 6 minutes total to render after doing the Batch Render command. Windows Vista computer purchased in May 2008, so about one year short of being state of the art technology for summer of 2009.
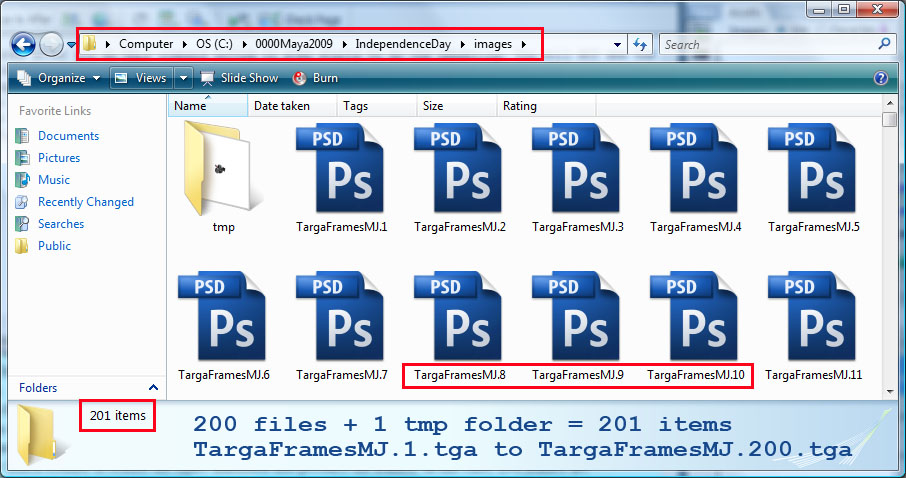
- Here is what the images folder looks like. I will eventually store the Adobe After Effects project file in the very same location and then render from After Effects out the Flash video and store that in the same location too. Finally, I will create a Flash .fla file, save that in the same location and publish the Flash application with the FLVPlayback control to the very same folder. Finally, it is upload everything to sunny.uni.edu computer. Well, not everything is needed. To be continued.