You make a NURBS Sphere, default settings. It will be sitting on a NURBS plane.
TranslateY to 1 so the NURBS Sphere is sitting on the NURBS plane,
i.e. the ball is sitting on the floor.
Turn on Grid snapping and set the pivot point of the NURBS sphere to be
at the bottom of the ball.
You will be able to Snap the pivot point to the origin, to (0, 0, 0).
Recall that the Insert Key turns pivot point setting on and off.
Set the Sections and the Spans each to 12 (Channel Box Inputs of the NURBS Sphere).
Modify menu > Add Attribute
name the attribute Squash
set it to Float with a Min 10, Max 10, Default 0
The Squash attribute will be a driver attribute. It will become a driver
attribute by using Set Driven Key.
Select the NURBS Sphere so we can rig it with a squash deformer.
Create Deformers menu > Nonlinear > Squash command (from the Animation - F2 menu set)
QWERTY - T is the shortcut to choose the Show Manipulator tool. Class #30 on 03/30 will be the first
time we have needed the T shortcut tool.
Watching the video you will see how to use the 3 manipulator handles.
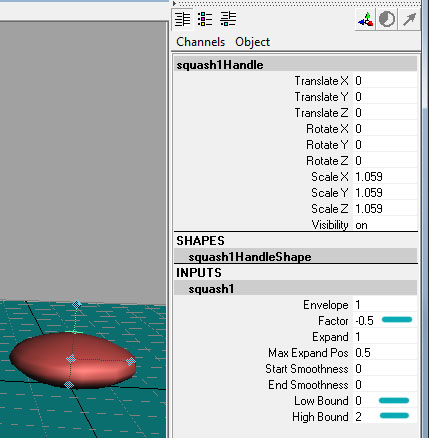
High Bound
Factor
Low Bound
The high and low bound handles determine what part of the object that is being enveloped by the deformer.
Notice how the Squash deformer allows the object to SQUASH and to STRETCH.
W is the shortcut to switch to the Move tool (Q W ERTY tools).
Using the Move tool, with Snap to Grid still on, drag the entire squash1handle down so it snaps to (0,0,0).
We are doing this so the ball squashes to the bottom of the ball, not to the center of the ball.
Choose T again to see the manipulator handles, if needed. (QWER T Y tools)
Now drag the high bound back up to the top of the ball, slightly above the top of the ball.
And drag the low bound back up to the bottom of the ball, slightly below the bottom of the ball.
Now we will set it up so the Factor attribute is driven by the Squash custom attribute.
The Factor attribute is part of the Squash deformer object.
The Squash attribute is part of the NURBS Sphere, the ball.
Animate > Set Driven Key > Set... (F2 menu set, Animation menu set)
-0.5 to 0.5 will be the range of values for the factor attribute.
-10 to 10 is the range we set up for the custom Squash attribute.
User ID: mayatuts
Password: morourke