Help menu Tutorials - Polygonal Modeling a helmet
- Relevant email note
about issues of
selecting FACES and how PREFERENCES should be adjusted to what you
are needing to do. Preferred way of selecting Faces in the Helmet
tutorial project are NOT the preferred way in the wine glass modeling!
Also, more on how to do the wine glass model (Australian Video version).
- We
started this tutorial on Friday, October 10th on UNI Panther homecoming day eve. You should try to repeat what we did in the hands-on class several times for practice over the next week. Try to move ahead and do the Editing Components in the Orthograhic Views portion of the tutorial and add that experience to your growing Maya skill set.
- You saw the Display > Heads Up Display > Poly Count command for the first time. When you redo this tutorial, go to the Display menu (D is the 5th fixed menu in FEMCDW, i.e. FEMC D W) again. Do that BEFORE you do the Smooth operation. Write down how many
vertices and faces and edges you have in the model. Leave Poly Count display on, and do the Mesh > Smooth operation as instructed in the tutorial. Note the increased Poly Count in the Smoothed Mesh.
- Useful review by email note of
WHAT
IS TO BE DONE and what has been done. Your goal: Read, Do and Get Through
9 of 21 parts of the lesson.
- Click to see the two images in the My Computer window. Note that you do NOT have to ever find them or look at them this way to do the tutorial, which uses the View menu >> Image Plane >> Import Image... command dialog to get them into the Front View Panel and the Side View Panel.
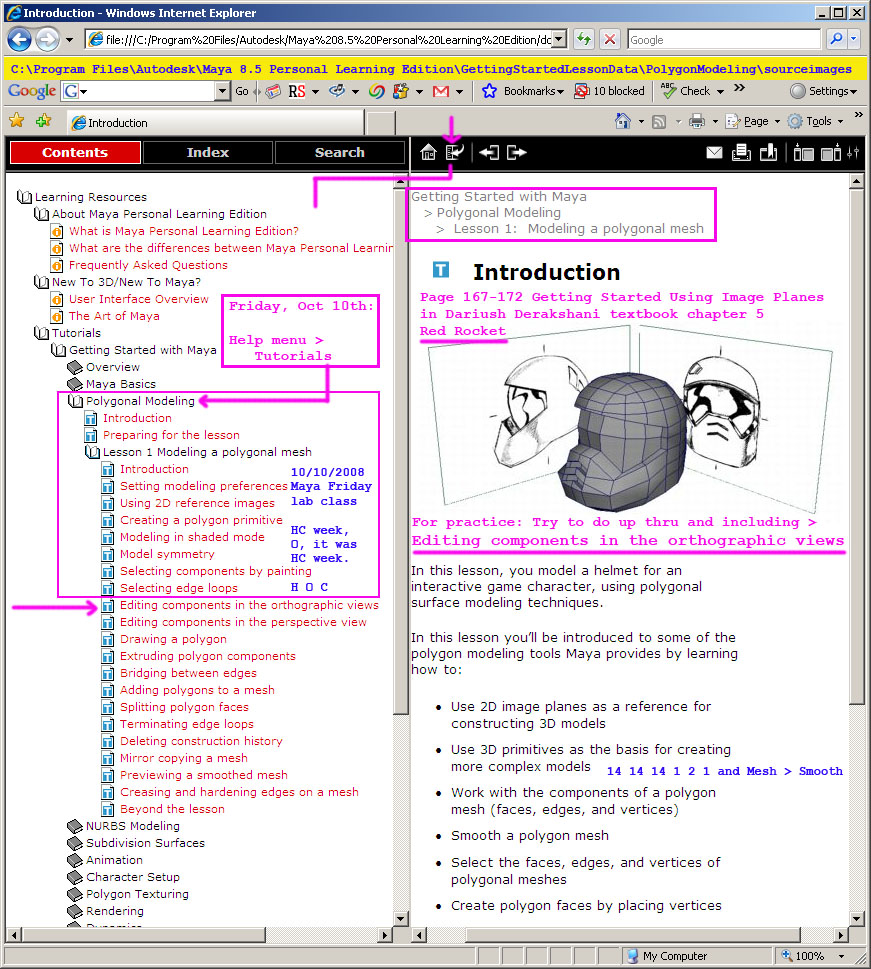
- The Red Rocket modeling with NURBS chapter of the Dariush Derakhshani Introducing Maya 2008 textbook explains and walks you through the process of using Image Planes. It is probably best to do this helmet modeling turtorial first, as the red rocket modeling assumes too much that you will know to do on your own. It is great to read pages 167-172 of the D.D. book and perhaps try it out. Just don't get discouraged if its too difficult until later when you are more experienced because of the helmet tutorial.
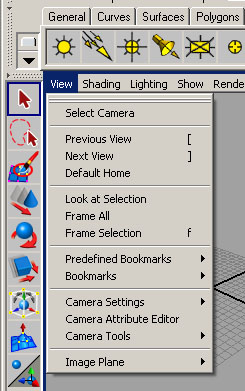
- What tool from the Maya toolbar did we use while doing this tutorial
that had never been used or demonstrated before in the 810:088 class until
today (10/10/2008 homecoming eve)?
- What two Panel menu choices did we do for the first time ever in the Friday, October 10th lab class? Read the tutorial to review this and verify this before Monday.
Look at the View menu. We actually did a Shading menu command and a Show menu command we had never done before too.
Perhaps two Shading menu commands. Exercise: See if you can figure out what FIVE Panel menu choices we did for the first time.
- What command on the View menu have we used in class before and seen demonstrated in the class before? Most everyone used this command when we had a hands-on class using the CS departments cart laptops in our 328 ITT 4th floor classroom. (Hint: We had mousepads and mousepads do not have a MMB, i.e. do not have a middle mouse button).
- Where can you find the JPEG images? I have shown the path to get to the tutorial examples folder above. It is also explained in the tutorial itself, somewhat. It does not tell you to look in the Program Files folder on the C: drive of your computer. If someone from the class emails me, I will tell Mac users how to get to that folder.
  C:\Program Files\Autodesk\Maya 8.5 Personal Learning Edition\GettingStartedLessonData\PolygonModeling\sourceimages

  C drive >> Program Files folder
          >> Autodesk folder (Autodesk is the name of the company that bought Maya
                                 from Alias Systems Corporation, which was the original company
                                 that had created and still owned Maya when it received the Hollywood
                                 Oscar for Scientific and Technical Achievement in March of 2003).

          >> the rest of the pathway to get to the PolygonModeling folder
                                        and to the sourceimages folder

             is explained in the tutorial before you need to do the import of the two imageplanes.
- To be continued later this homecoming weekend... Check back again before Monday's class.