HOC. The 2nd icon of the HOC icons is for: Select by Object Type
The 2nd icon is highlighted in PURPLE above. Maya students: Can you recall what each of the three H O C letters stands for?
Photoshop Edit menu > Stroke command was used to create the rectangular highlight. 810:022 MASI students, please click here to see the Photoshop Edit menu > Stroke dialogue box. Note that the Marquee tool, in its default rectangular shape, was used to create the rectangle selection and then the Edit > Stroke with a 3 pixel width was applied.
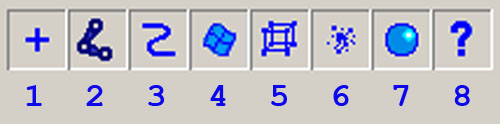
- Select HANDLE objects. The first icon is the one that looks like a + (PLUS Symbol).
- Select JOINT objects.
- Select CURVE objects.
- Select SURFACE objects. This is the only one you need to be aware of for first semester MAYA 3D Graphics class. When you RMB on this icon, you will see NURBS Surfaces, POLY Surfaces, Subdivision Surfaces and Planes are the four different options. Each one has a checkbox. By default, all four are either ON or OFF. For being able to select only NURBS objects, for example, you would turn ALL four OFF, and then RMB and turn only NURBS Surfaces on by checking its checkbox. RMB means Right Mouse Button click or RMB press to get a popupmenu.
- Select DEFORMATION objects.
- Select DYNAMIC objects.
- Select RENDERING objects.
- Select MISCELLANEOUS objects. This is the 8th icon, and it looks like a ? (question mark).

