My class notes indicate my plans for the class. They sometimes communicate information that is useful to know for class and, thus, can be a reference for you. Sometimes they merely indicate talking points or planned activity. They will often have links that could be useful. All in all, they are probably worth reading/reviewing before and/or after class. Certainly, students who will be or have been absent should look here.
Day 1 — Course Intro
Logistics
- Today
- Roll
- Course & instructor introduction
- Success in this course
- Brief discussion of Programming & PcPI
- Wonderings? Comments?
Roll, Partnering & Seating Chart
- Eventually, I'll prepare a seating chart for taking roll with partners seated together
- Partners and partnering discussion
- why partners?
- are partners required?
- when? (soon!)
- Wonderings? Comments?
- (After choosing partner) Why choose a particular seat/location?
- to see/hear better
- to have access to electrical power
- to be closer to/farther away from me
- Take roll
Instructor & Course Introduction
Course Success
Our goal is to be successful? What does that mean? What can we do to make the course successful? (Discuss student responses to the following.)
- What does success look like? For you?
- What does success look like? For me?
- What can I do to enhance the likelihood or degree of success for reaching the course goals?
- produce learning activities that have students try to do what I want them to learn to do
- design learning activities that I think will motivate students—topics that:
- are fun (it's hard to find something fun for everyone)
- are challenging, but not too challenging
- allow for student choice and creativity
- anything else?
- "tell" a little as possible at the start of each lesson/activity
- provide assistance to students when requested
- allow/have students work together whenever reasonable
- anything else?
- What can you do to enhance the likelihood or degree of success?
- Attend class and think/question during presentations and discussion. (What is being said? Do I understand/does it make sense? Do I agree? ...)
- Ask questions when you don't understand/agree.
- Persist when I am too dense to see your point.
- Do all the assignments to the best of your ability.
- Seek help when you have difficulty on the assignments. (e-mail, office hours, classmates, ...)
- Try stuff beyond what is assigned or what you know.
- Think about assignments from the teacher's standpoint, e.g., it's goals, why/how it is useful, how it could be adapted, ...
- Wonder about how/whether programming is similar to or different from other content.
- Be curious.
- anything else?
- Anything else? Wonderings? Comments?
Programming & PcPI
This course hopes to teach (that you learn) programming (in Visual Basic). So, ...
Programming is problem solving
Like giving directions in a foreign language, programming is a problem solving activity. But, for people learning to program, there are three problems, not one. In our example, you'd first have to figure out just what directions you wanted to give. Then, you would have to translate those directions into the foreign language (and translations are not simple word for word substitutions). But if you don't know the foreign language, you have to learn the language before/as you do the translation. Similarly for programming—3 problems:
- Developing the solution (probably an outline of actions needed to solve the problem)
- Translate the solution into code, including making sure the problem representation in data the computer understands will work
- Deciding which language pieces you need to translate the solution into—may involve learning pieces you didn't
PcPI
Programming is often taught like math. We show you a "thing" and ask you to work on a bunch of "things" like it. Then we show you another "thing" and ask you to practice things like it. And another, and another, and ... But, they (math folks) and we (computer science folks) don't usually address what the "things" are good for—how they help us solve problems. We (several of my colleagues and I) think you will learn better if you see the how/why—the context of the problems.
PcPI (problem-centric programming instruction) attempts to focus on problems as we teach programming (rather than just teaching the language being used). So, many of the exercises and problems will be presented with a story/context or as a word problem. That means that you will have to figure out what to to before you start doing it, i.e., it will be (hopefully) a problem solving process.
In most problem solving contexts all you have to do is solve the problem. In programming you have to develop a solution to the problem and then covert the solution to a computer program. For you, there is the additional burden of learning how to program while you are doing the problem solving.
Just like riding a bike, playing a musical instrument, performing a beautiful dive, etc., programming is easy, if you know how to do it. If you don't know how to do it, it might come to you fairly easily, but it might also be quite daunting. With PcPI we are trying our best to work on all three problems: solving the problem, converting the solution to code, and learning the code and how it works.
So, ...
- Assignments will have lots of practice exercises to cover learning the programming language
- Most of them will have a problem context that is an "every day" kind of problem (for someone). Those that don't will be in the form of a generalized problem, e.g., "Find the largest of three values."
-
- Units IV & V will have slightly larger problems that involve choosing or repeating the kinds of things learned in Units II & III
- We will talk about problems, problem solving, and a process you can use when you have trouble.
Wonderings? Comments?
Next Time/To Do:
- Plans:
- To prepare for class:
- If you have a Windows machine, download and install Visual Studio (Mac folks have to use a PC or figure out how to run windows on their machines.) Start it up (to make sure it works).
Any final questions? comments? wonderings? . . . See you Thursday.
Day 2 — Introducing Visual Studio & Visual Basic
Logistics
- Remember to be seeking a partner
- Demonstration of Visual Studio
- Wonderings? Comments?
Laptop Use in ITTC 328
If you have your own computer you can ignore this. If you need to use our laptops, please note the following.
Overview
Visual Studio is an IDE (interactive development environment) for creating programs in a variety of languages, including Visual Basic. The first programming task is to create the forms/windows for the program. Then code can be written to indicate what happens with each of the form elements/controls.
Typically each VB program is a project and is stored as a folder containing a number of files and other folders. Each project has a number of forms or windows, one of which is a start form called Form1. Forms have properties most having default or assigned values. We will want to change the values for some of the properties (e.g., (Name) and Text). Then we will start producing our forms. When we have them created we will need to identify which form we want to use as our start form.
We will typically just ignore Form1, the default form Visual Studio creates as we produce the form(s) needed for our program(s). (Ask me why if you want to know.) The general process for doing a VB program/project is shown below. It assume you are using the lab computers but should apply in most any situation.
Note: You will need to be familiar with your Google Drive or bring a flash drive to save your work.
We want to produce a project with forms similar to the images below. This project show a wide variety of the controls or form elements you might use.
The steps for creating the project are provided below. You should be able to refer back to these notes when doing your own work.
Start a New Visual Basic Project
You'll need to start up Visual Studio and make sure it is set for you in Visual Basic. Then start a new project, give it a name, and save it all. Details below.
- start Visual Studio
- click on the Windows (start) icon in the lower left of the screen
- find Visual Studio (you may have to click on All apps and scroll down to Visual Studio)
- select (click on) Visual Studio—it may take a while to start
- Start and name a new project
Questions? Comments? Wonderings?
At this point, Visual Studio should open and a form window (titled "Form1") should appear. There may be some other elements showing. The ones we are interested in are: Toolbox, Solution Explorer, & Prioperties. If they do not seem available you should find them by looking in the View tab. Make sure they are all available. You might experiment with "pinning" them to the window, unpinning them, closing them entirely, and reopening them using the View tab.
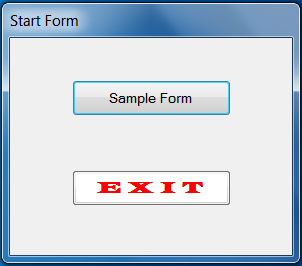
Create the "start" Form
The next step is to create our start form. We could rename "Form1", but that sometimes creates problems so I suggest we just ignore Form1. Close it up and create what we want.
Questions? Comments? Wonderings?
Adjust the Start Form Properties
Change appropriate/desired form property values using the Properties window.
- First you will need to open the Properties window if it is not already open. You might find its name on the dock (a space to the right of the big window), if so, click on it and "Pin" it to the window. If you can't see the window or the word "Properties", click the View tab and select Properties Window" (its near the bottom of the list).
- Set the
Text property
The text property is the value that shows up as the name or title of the form.
- Reset the
ControlBox property
This property determines whether the minimize, maximize, and close buttons are present. Often, we will want the user to use our exit button rather than the X to close the window.
- select (click on) the form
- in the Properties window find the ControlBox property—it should show the value "True"
- click on the drop-down menu (the little "v" or down-arrow) and select False—the controls should disappear from the form.
Questions? Comments? Wonderings?
Save All the Project
As with other things on the computer, you need to save your work occasionally. In Visual Studio saving means using Save All. Be sure to use Save All when saving your work. The first time you Save All, you will want to note where the file is being saved and perhaps change that location. I suggest you browse the computer and Save All the project to either your flash drive or to the "Desktop".
Add the Two Buttons
Our picture shows two buttons on the form that we need to add. We use the Toolbox to accomplish adding controls to the form.
- Open the Toolbox (perhaps using the View tab on the menu bar)
You may wish to pin the Toolbox to the window by clicking on the pushpin icon. You might also wish to pin the Properties window to the form. As with the properties window, the Toolbox might be already open (and pinned) or on the "dock", or you might have to open it with using the View tab.
- Find "button" in the list and either drag a button onto the form or select "button" and then click on the form
- For the "Sample Form" button
- select the button
- set its Text property to "Sample Form"
- get to the "Properties" window (discussed above)
- scroll down to the Text property
- change the value there appropriately
- click somewhere else or press the Enter key
- enlarge the button (vertically or horizontally as appropriate)
You will need to select the button then click on and drag an edge or corner to make the button the desired size.
- set its (Name) property to "btnSample"
In Visual Basic verything has a name. It is standard practice to use prefixes to indicate what the type of control. For buttons the standard prefix is "btn".
- enlarge the text on the button (by changing the Font property value)
- get to the "Properties" window
- scroll down to the Font property
- click on the value of the property, a box with an … (ellipsis) appears
- click on the ellipsis (a window pops up)
- change the size of the font
- click somewhere else or press the Enter key
- For the EXIT button
- create a new one as above, or just copy and paste the Sample Form button
- set the Text and (Name) properties to "E X I T" AND "btnExit", respectively
- change its font property (I used Latin (Wide) 12 pt)
- change its ForeColor property (I used Web|Red)
- change its BackColor (I used System|ControlLightLight)
Questions? Comments? Wonderings?
Add the Sample Form
Should be very similar to the above, just use different values for the Text and (Name) properties. A brief process is:
Questions? Comments? Wonderings?
Add the Form's Elements/Controls
Title label
The form has a Text property that might be thought of as a title but you might want have another title in the body of the form.
- From the Toolbox, select Label and put it on the form
- set its (Name) property — the standard prefix for labels is "lbl"; I used "lblTitle" in this case
- set its Text property — I used "Value of Label's "Text" Property" (the label expanded to fit the text)
- set its Font property — I used the Microsoft Sans Serif 18 pt (the label expanded to fit the text)
- set its BackColor property — I used Web | Gold
- set its ForeColor property — I used Web | Purple
- Save All
Questions? Comments? Wonderings?
Text box & label pairs
Text boxes can be used for input from the user or to display results the program might produce. Typically, the programmer has a label for each text box to indicate the desired input or the value displayed.
- as above, add a label to the form
- set its (Name) property, e.g., "lblNormal"
- set its Text property , e.g., "Normal Data Label"
- From the Toolbox, select TextBox and put it on the form
- Place it near the label — select it, click and drag it to the desired position (a small dash appears between it and the label and a purple line appears between the two)
- set its (Name) property, e.g., "txtValue1"
- copy and paste the text box and label pair
Either click and drag to include both controls or select one press the shift key while selecting the other. Press CTRL-C & CTRL_V to copy and paste (or right click and select Copy and Paste). A new pair of controls should appear.
- place the controls
The new pair is selected when copied, click on one of the pair and drag it to align with the existing pair.
- set property values
- Save All
Questions? Comments? Wonderings?
(Got to about here on Day 2)
Set of Radio Buttons
Radio buttons allow us to choose one item/value/choice for a set of possibilities. If you choose (click on) one it shows to be selected. If you choose (click on) a different on, the first one become unselected and the second shows to be selected. Note that VB groups all radio buttons together to allow only one to be selected, unless they are grouped by the programmer. Thus, we will place our radio buttons in a group box so they won't interfere with any other radio buttons that might get added later.
- In the Toolbox, find & select GroupBox
It will be in the "Containers" part of the tool box. Select it and put one on the form. Set its Text and (Name) properties to "Radio Button Group" and "grpRadios" respectively.
- In the Toolbox, select RadioButton and place it inside the group box on the form
- set its Text and (Name) properties to "Female" and "rdoFemale" respectively ("rdo" is the standard prefix for radio buttons)
- do two more radio buttons
Remember you can get one from the ToolBox or you can copy and paste. With only three, either is about as fast as the other.
- place them appropriately
- set the seond one's Text and (Name) properties to "Male" and "rdoMale" respectively
- set the third one's Text and (Name) properties to "Other" and "rdoOther" respectively
- check to see that everything looks okay, fix whatever doesn't
- Save All
Questions? Comments? Wonderings?
Set of Check Boxes
Check boxes allow us to indicate one or more items/values/choices for a set of possibilities. If you choose (click on) one it shows to be selected. If you choose (click on) a different on, both show to be selected. Clicking on a selected one, changes it to unselected. We typically place our associated check boxes in a group box. It can help the user know what the check boxes refer to.
Questions? Comments? Wonderings?
List box
The big white thing in the middle is a list box. It is used when you need to have a list that you can put things in but be able to select them individually. The process for it is similar to all the others.
- From the Toolbox, select ListBox and put one on the form
- set its (Name) property — the standard prefix for list boxes is "lst", perhaps "lstSample" in this case
- Save All
Questions? Comments? Wonderings?
Picture box
A picture box allows VB to show images easily. The images can be changed using code relatively simply. The picture boxes can be of most any size and the images can be scaled to fit inside the box. Placing one in your form is like everything else.
Now we need to get the pictures for the cards. I have some prepared. We will need to download the zipped set of images, unzip them, and import them as resources for our program. Details are given below.
Now to load the pictures into our resources.
- in Visual Stutio, click the Project tab
- click ...Properties (at the bottom)
- click Resources
- click the arrowhead on the Add Resource tab
- select Add Existing File
- select and insert one picture into the resources
- do it again (can select the rest of them)
- get back to the form (click on the tab for for the project's sample.vb (Design) window
Next, we will want to put one of the card images into the picture box. We do so by setting a value to/for its Image property.
- select the Image property of the picture box
- click on the box with the ellipsis
- choose from resources, which ever card image you prefer
- check to see that everything looks okay, fix whatever doesn't
- Save All
Questions? Comments? Wonderings?
Menu strip
I think the only thing left is the menu strip. The Control for the menu strip doesn't actually show up on the form, it appears in an area below the form. The process is similar to others.
- Find MenuStrip in the tool box
- add one to the form
- notice that something appears below the form and a menu strip shows up just below the top of the window
- at the top, type "File" where it says to "type here"
- notice that you can now add additional menu items and sub-items below/for the File menu
- Save All
Questions? Comments? Wonderings?
Run the Program
Now let's see what happens when we attempt to run the program we created.
Zip and send the project
When you want me to run your program (e.g., when you submit a project) you will need to send it to me via e-mail. To do that, you will have to compress the folder into one file and change its name so Gmail will be willing to let you attach it to a message. The process for doing that is:
- be sure you get to the project folder (the one that contains everything else)
- right-click on the folder
- select
Send to
- select
Compressed (zipped) folder
You may have a chance specify where you want the file to appear and what you the file to be named. Just be sure you can find it.
- change the name of the file
Gmail will not allow you to attach .zip files, so you have to fool it by changing the name. I suggest changing .zip to .zipped or .zipp. To do so:
- right click on the file name and select
Rename
- add
ped or p to the name
You should now be able to attach the file to your Gmail mail message. But you might have difficult here. You many not be able to see the .zip extension in which case changing the name does not affect the extension. You will need to fix it by:
- opening up the Control Panel in Windows (click on the Start icon and select Control Panel)
- selecting Appearance and Personalization
- selecting Folder Options
- clicking on the View tab
- clicking on Hide extensions for known file types so it is not checked