Autodesk Maya to Adobe After Effects to Flash Video to Flash application


  1. Overview/outline of the Maya to AE to FLV to Flash SWF process - April 24th, 2009 text email note.
  2. Create a Maya scene. The Maya scene we created on Wednesday, July 1st, 2009 had two lights, one polygonal sphere, a floor and a back wall. The length of the animation was 200 frames.
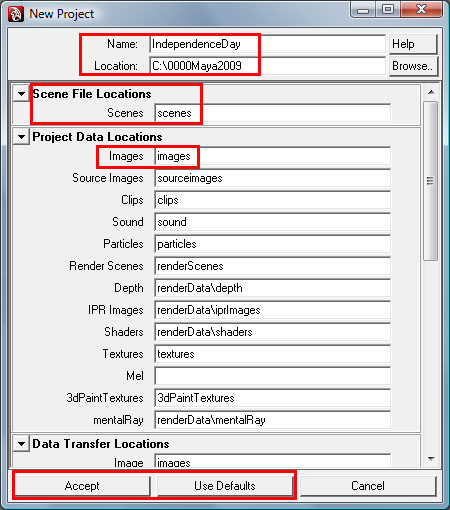
  3. When you are ready to move your Maya animation up to the web, it will be easiest if you have saved it in a Project folder. Maya's file menu, Project command group, New command should be done so that you have set up a project folder. I am naming my project folder IndependenceDay for the purpose of this example.
    1. New Project dialog box - change the Name: from the default New_Project to IndependenceDay.
    2. Set the Location: to wherever you want this project folder IndependenceDay to be stored at. I am saving my project in the C: drive 0000Maya2009 folder for purposes of this tutorial. C:\0000Maya2009 is the Location: value.
    3. Click the Use Defaults button at the bottom of the New Project dialog box.
    4. Click the Accept button.

  4. Save your Maya scene. It will be saved in the folder named scenes, which in my example is inside the folder named IndependenceDay. My scene is named july01, so the entire path is C:\0000Maya2009\IndependenceDay\scenes\july01.mb where the last portion is the file name.
  5. Tumble, Track, Dolly your Maya scene. Using the Rendering menu set, Render menu, Render Current Frame command test out what a few different key frames of your animation will look like. Adjust the Persp window by Tumbling, Tracking (aka Pan using Alt+MMB), and Dollying and adjusting the lights and position of the camera until Rendering the Current Frame shows a look you are satisfied or thrilled with. Alt+LMB Tumble; Alt+MMB Track; Alt+RMB Dolly.
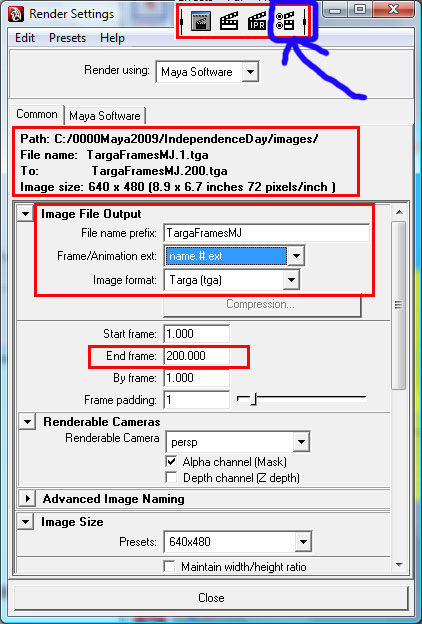
  6. Instead of using the Rendering menu set, Render menu, Render Current Frame command - you might wish to use the Status Line 7th group rendering icons. The 2nd icon in the 7th group is Render Current Frame button.
  7. The last icon in the 7th group is very important. It allows you to Display Render Settings window. As of Maya 2009, this is the only way I have found to get set up for a batch rendering. It is indeed strange that the Render menu commands offer no chance to get to the Render Settings window, but that is just the way Autodesk has decided to do it. I will not be surprised if the next version of Maya (Maya 2010) offers a command on the Render menu to Display the Render Settings Window.
    1. Note that the project folder is IndependenceDay and that the images folder is where the rendered frames of the animation will be stored by Maya whenever you do a Batch Render after you set these Render Settings.
    2. Be sure to choose the name.#.ext format for the Frame/Animation ext: choice in the dialog box above!
    3. The End frame: value will NOT be set to whatever your Maya timeline or playback range is set to. You must remember to change this or it will just render frames 1 to 10 of your Maya scene. In other words, 10 is the default End Frame value.
    4. Choose TARGA, as shown above.
    5. Make up whatever name you want for the File name prefix. Otherwise, it will use a default name for the prefix. I usually choose a short, 4 or 5 or 6 letter long name such as ocean or ball or frodo or bilbo or staypuft, for examples.
    6. Click the Close button when you are finished.
    7. Render menu set > Render menu > Batch Render to render the entire animation and produce the frames. In this case, 200 frames are produced.
    8. Warning: Maya takes several minutes after you do this command before it even starts to do the rendering. You will NOT see the days of our lives icon indicating that processing is going on with the application. After several minutes you will begin to see messages flashing in the command response and error message area at the bottom right side of your Maya window. This will continue for anywhere from 1 or 2 minutes to 10 or 15 minutes depending on how long and how complicated your animation is. The animation that I produced here in this example took about 5 or 6 minutes total to render after doing the Batch Render command. Windows Vista computer purchased in May 2008, so about one year short of being state of the art technology for summer of 2009.
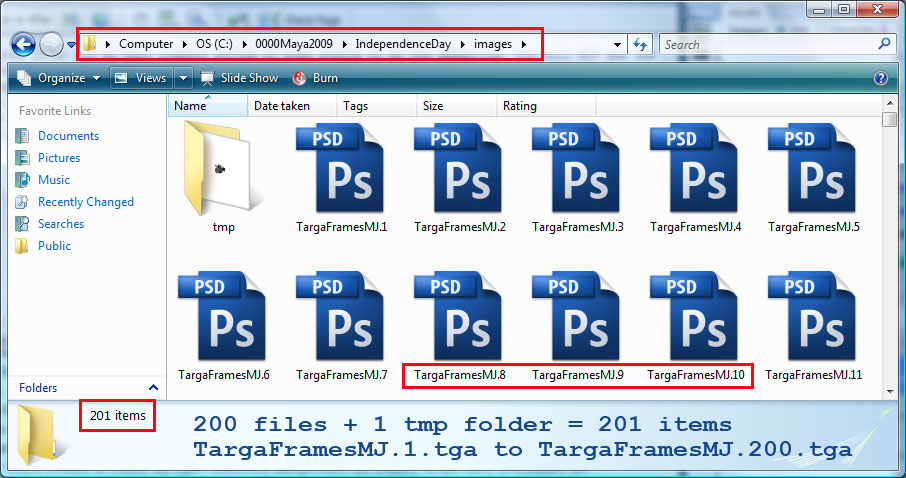
    9. Here is what the images folder looks like. I will eventually store the Adobe After Effects project file in the very same location and then render from After Effects out the Flash video and store that in the same location too. Finally, I will create a Flash .fla file, save that in the same location and publish the Flash application with the FLVPlayback control to the very same folder. Finally, it is upload everything to sunny.uni.edu computer. Well, not everything is needed. To be continued.
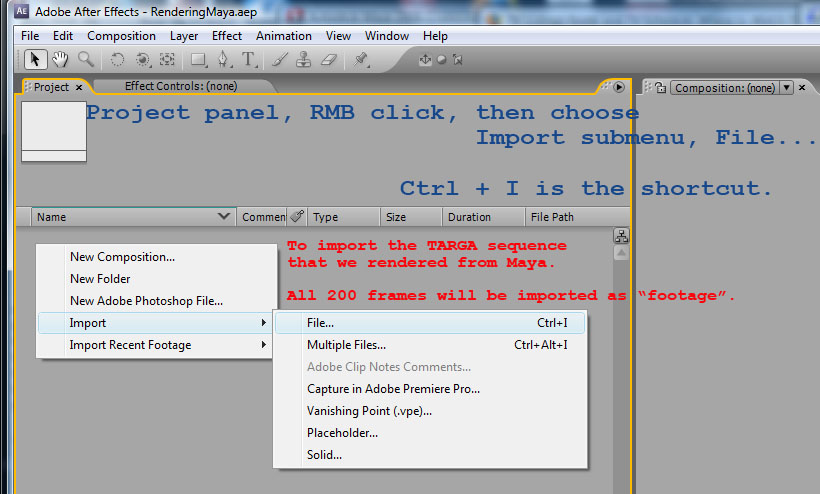
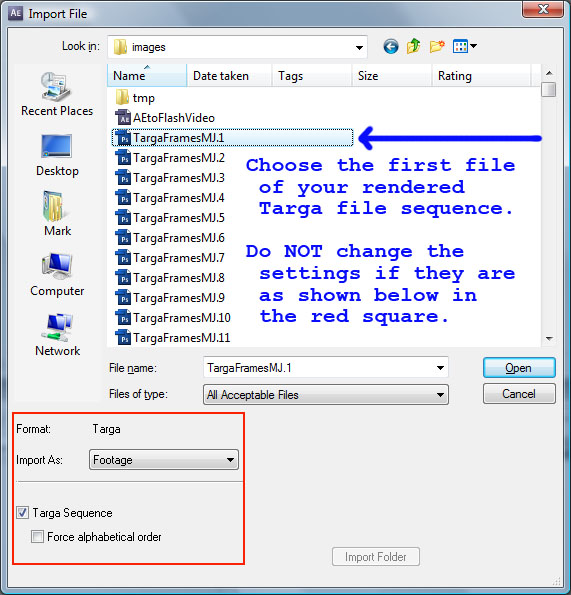
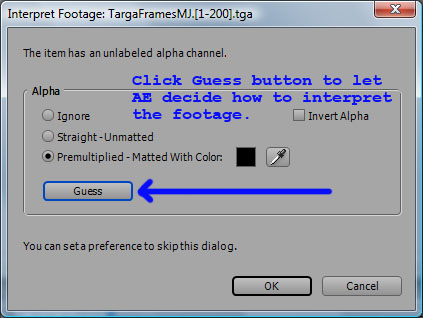
  8. Adobe After Effects import footage (the 200 Targa frames) is done as shown in the following 3 images. RMB means Right Mouse Button. The 3 images below show the process of importing the footage and what the final result will look like in the Project panel. Note all of the information that the project panel conveys.
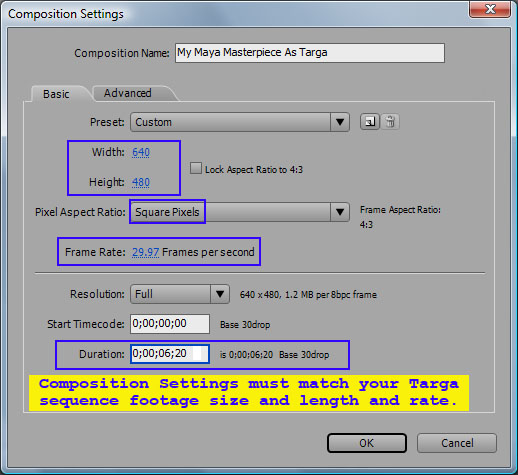
  9. Composition menu > New Composition... will open up the following dialog box. Use the settings shown in the Project panel for your Targa Frame sequence footage as the settings in this dialog box. If you accidently press the Enter key (Return on Mac), it will close the dialog box. If that happens, use Composition menu > Composition Settings... to go back and finish the settings.
  10. Drag the footage ( in my example TargaFramesMJ.[1-200].tga ) from the project panel over to the Composition panel. It will fit perfectly, as the composition was created to match the size of the footage. After Effects will help you to place it by "snapping" it slightly when it is perfectly centered.
  11. Press the 0 key on the numeric keypad to see if the animation runs as you expected. It will be slow to do the "RAM Preview" the first time through, but goes at the real speed after it plays once. You can also scrub the timeline by dragging the CTI (Current Time Indicator) back and forth. Press any key to stop the running animation. Press the HOME key to move the CTI to frame 0 (1st frame) of the animation timeline.
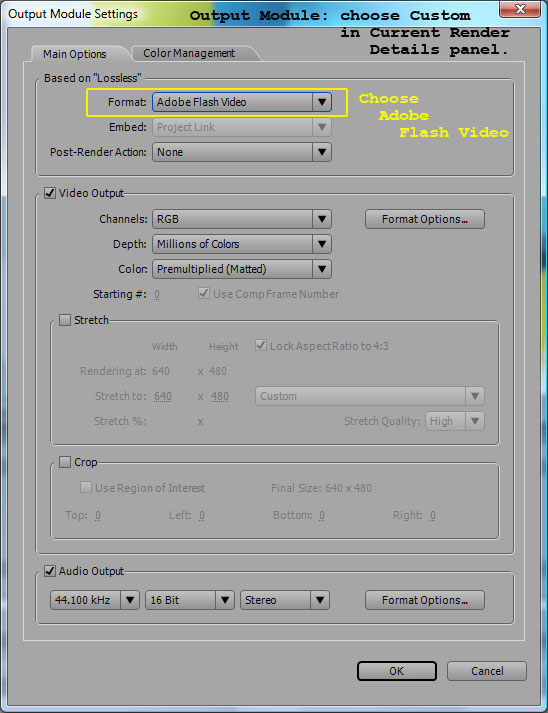
  12. Composition menu > Add to Render Queue is the next step.
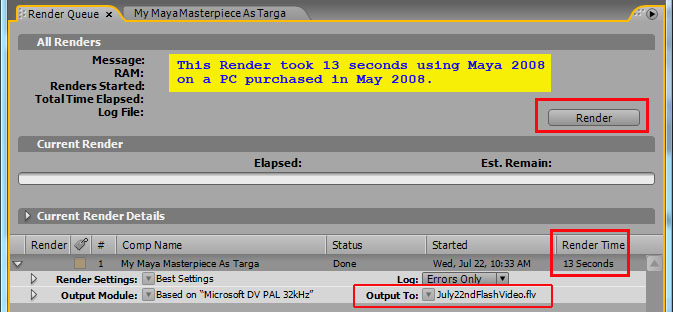
  13. Now choose the location where you want to save your FLV Flash video by clicking on the blue, underlined hypertext link after the Output To: arrow. Do NOT click on the Output To: pull down menu arrow!
  14. Now click the Render button. It is clear over on the Right side of the Render panel. It is NOT the Render that you see above here on the Left side of that panel.
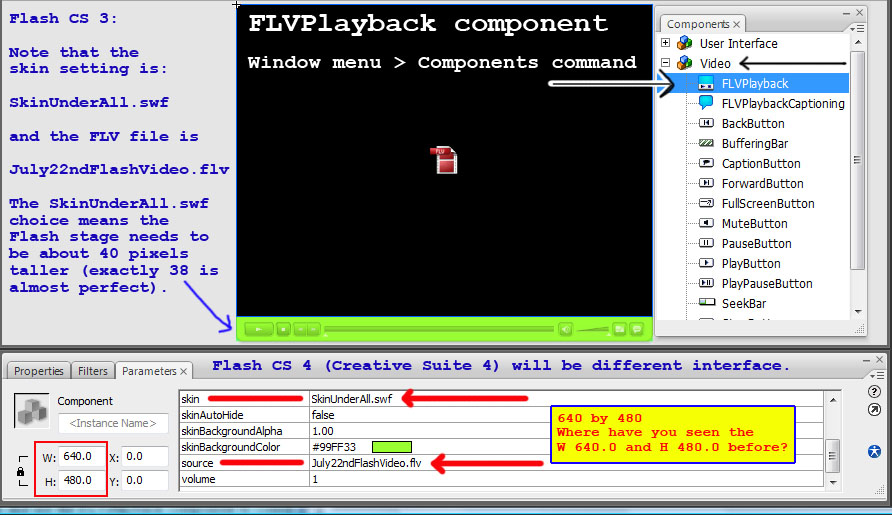
  15. NEW: How to use the FLVPlayback component and avoid a very common slimer, a very confusing problem that prevents your Flash Video from playing after you upload everything to the web server. This is VIP! This is new as of Thursday July 30th.
  16. Create a new Flash application and use the FLVPlayback component to connect up to the Flash video. Publish it. There is plenty of information elsewhere in the Visual Effects, Animation, and Motion Graphics web site and this is also exactly the same as what we did when we ClipNabber Clip Nabbed a YouTube FLV video and then published it using the FLVPlayback control. We did this several times in June and there is video captures of some of the StudioIT 3 classes where we covered that. It is also covered in your Flash to After Effects : After Effects to Flash textbook.
  17. See After Effects For Flash - Flash For After Effects textbook - Part IV: Enhancing Video with Flash

    1. Chapter 12: Professional Encoding of Flash Video
    2. Skinning the video             - pages 281-282
      The After Effects Render Queue - pages 289-292
      
    3. Chapter 13: Creating Interactive Controls
    4. Adding Simple Interactivity with Buttons - pages 300-306
            
          Adding Play and Pause Buttons  - pages 300-301
          Adding Instance Names          - pages 301-301
          Coding the Pause Button        - pages 302-303
          What Does the Code Mean?       - pages 304-305
          Coding the Play Button         - pages 305-306
              
      Advanced Interactivity                     - pages 306-314
          
          Adding Invisible Buttons             - pages 306-309
          The Code                             - pages 309-311
          Making the Code More Universal       - pages 311-312
          Coding the Other Buttons             - pages 312-314
      
    5. Chapter 14: Making Video Accessible
    6. Creating Captioned Video       - pages 326-334
         
          Display Captions with ActionScript - pages 326-327
          Creating a Timed-Text XML File     - pages 328-329
          FLVPlaybackCaptioning Component    - pages 329-331
          Changing the Look of Caption Text  - pages 331-332
          Using Your Own Text Field 
                    to Display Caption Text  - pages 332-334
      

  18. Here is the Maya application created to illustrate the entire process. It does NOT have any extra Adobe After Effects Masks or Text Effects, but those could have easily been added as extra layers above and/or before or after the TARGA imported footage.
  19. Wednesday, July 22nd class: Maya to Targa to After Effects footage to AE Composition to Flash video to Flash class example. Shows what to upload to a web server like sunny.uni.edu too.
  20. Here is an example of a published Maya project that includes some After Effects added text effects. It also illustrates an example of a storyboard.
  21. Animation Curves in Maya - Bouncing Ball animation shows another example of the Render Settings window being set up to create 150 TARGA files named cartoonBall.1.tga to cartoonBall.150.tga so they can be footage for Adobe After Effects.
  22. Storyboard example from January 2009 - LOGO exercise PLAN and storyboard links. Learn more about STORYBOARDING and apply it to your projects.
  23. Another example of Text Effects added to the Maya TARGA rendered footage by adding a Text Layer in After Effects before placing the entire composition in the AE Render Queue and rendering to Flash video FLV file.